3D Printer Dry Box - Ammo Can Version!
Published by Spencer C. on Jan 29th 2025
3D Printing Dry Boxes: Why They Matter and How They Work
Filament storage is crucial for high-quality 3D prints, as many materials—such as PLA, PETG, and especially Nylon—are hygroscopic, meaning they absorb moisture from the air. Excess moisture leads to poor extrusion, weak prints, and surface imperfections like bubbling or stringing. A 3D printing dry box prevents these issues by maintaining a low-humidity environment for filament storage. We made ours from a surplus military ammo can for around $100 - Watch the YouTube video here!

How Dry Boxes Work
Dry boxes function by creating an airtight environment where moisture is controlled using desiccants, such as silica gel. These materials absorb water from the air, keeping the relative humidity inside the box low. Some setups also include humidity sensors to monitor conditions, ensuring optimal filament storage. A well-sealed dry box extends filament lifespan and improves print consistency.
A common misconception is that dry boxes will quickly dry out wet filament. While a low humidity environment will draw moisture from a contaminated spool, the rate at which it removes the moisture is extremely slow and inefficient. The best way to use a dry box is to load it with freshly dried filament, and in our experience the best way to dry out spools is with food dehydrators or a good old fashioned home oven set on keep warm (~150*F or less). The recommended drying heat and time required for your specific material is published by most manufacturers online - follow their guidance!
Why We Used an Ammo Box
While many dry boxes are made from plastic storage bins, we opted for an ammo box due to its durability, airtight seal, and rugged design. Ammo boxes are built to withstand harsh conditions, making them ideal for filament protection. The heavy-duty latch and rubber gasket ensure a tight seal, preventing air exchange and reducing moisture exposure. Additionally, the metal or thick plastic construction provides superior protection compared to flimsy storage containers. They come in many shapes and sizes, so do some research and see if there are any sized better suited to your needs - for us, we opted to use the M548 ammo can design. This box is pretty large, but it was perfect to hold our 14" diameter 3kg spools.
An added benefit of using the ammo cans is that he rigid metal walls allowed us to screw components directly into the box. The additions we made include the installation of a digital scale so we could read out exactly how much material we had left inside the box at a glance, and a quick disconnect bowden tube with an O-ring seal. This setup ensures that our filament stays dry and print-ready, reducing failures and improving overall print quality.
Parts, Cost, and Modifications
The sealing latch design was necessary due to the pivoting latches on the ammo can interfering with a fixed tube exit point. We needed a way to remove the bowden guide tubes quickly from the cans without compromising the desired air tight seal. If you decide to print these yourself, you'll need to source the O-ring, 6mm bolt for the sliding latch, and 1/8" push connect PTFE tube fittings.
The spool scale was inspired and heavily influenced by the scale built here: Spool Scale by Interlink Knight. I simplified the design of the face plate of the case for the PCB for easier 3D printing with less support. It requires you to use taller buttons on the PCB (~10mm tall) but saves time and uses fewer printed parts.
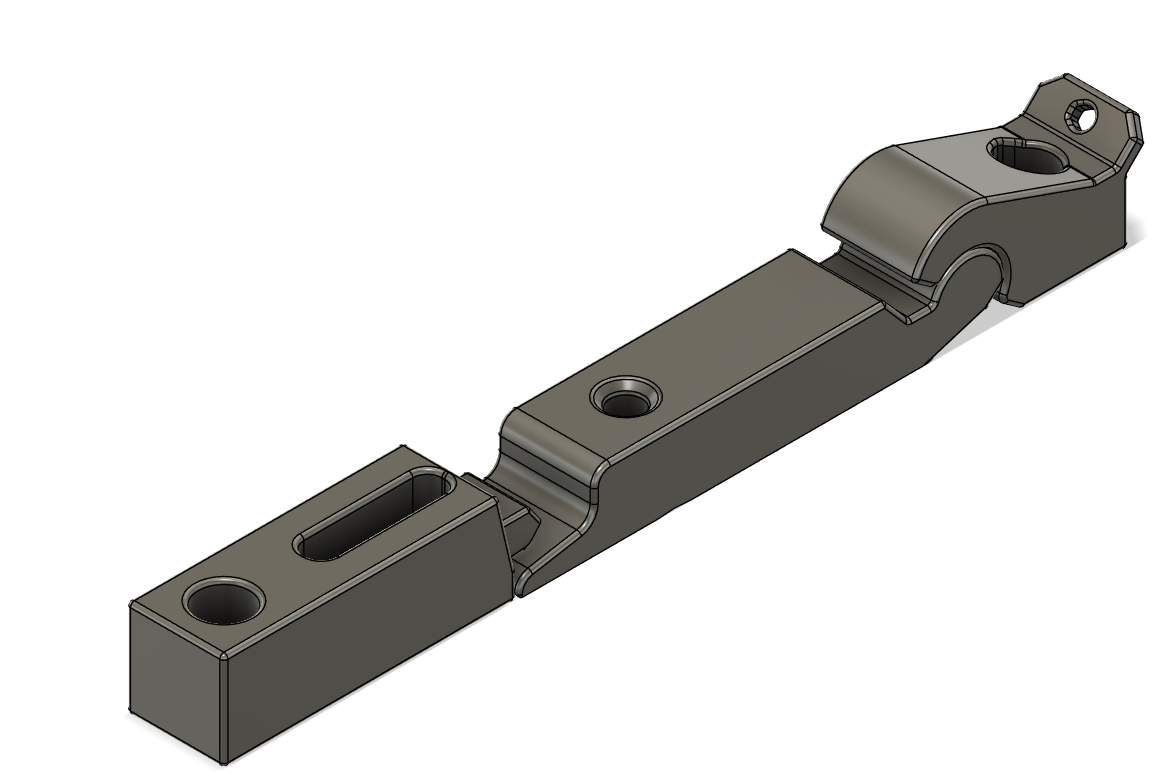
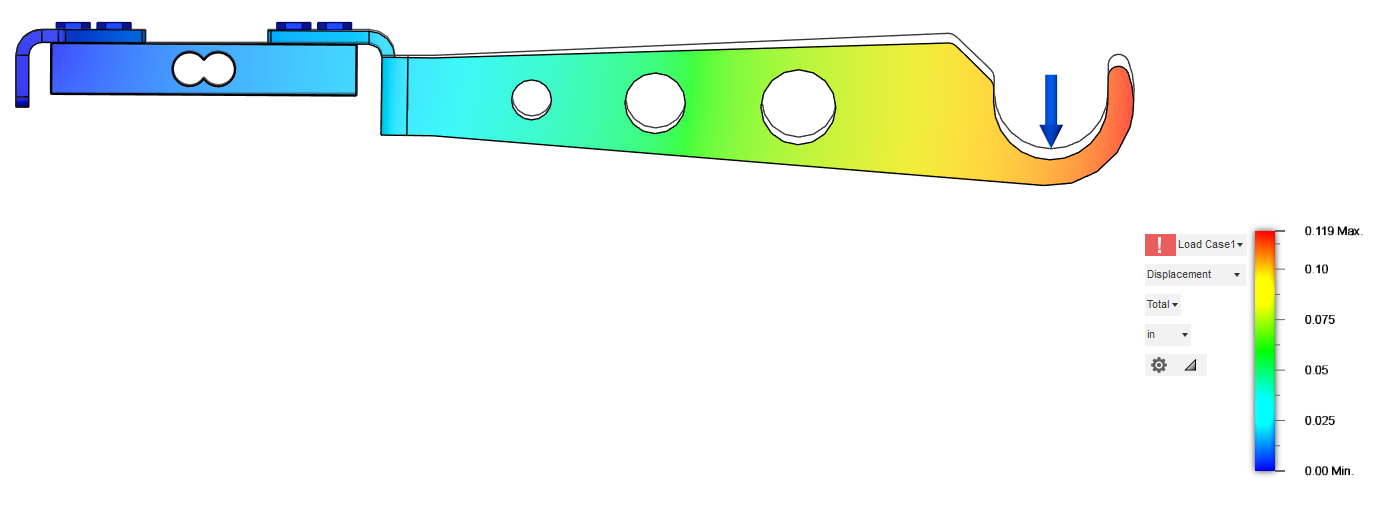
The load cell inside the drybox is mounted used SendCutSend parts, .DXF files below. We used 1/8 steel for the arms, as it was a good blend of strength against bending and cost. A deformation analysis in CAD showed a 1/8" deflection at the furthest point of the arms under a 10lb load, which we deemed acceptable. In real life, it appeared to be a bit more than that, however it is still acceptable.
The cell has 4 wires that output the signal - these were connected to 4 pin bulkhead connectors that I passed through the wall of the ammo can. They were called 'aircraft style' screw fittings and I sealed them with an O-ring. I connected these to the PCB and drew power for the arduino nano clone from the power supply unit on the printer, fed though an inline buck converter to convert it to 5V.
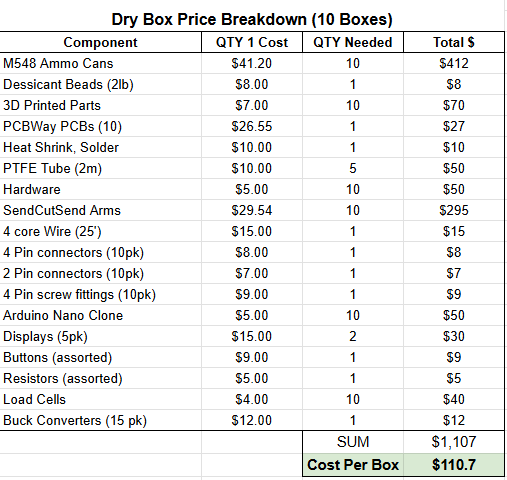
Total cost for us to make 10 of the boxes was $110.70/ea. This could definitely be way cheaper if you shop around for better deals on electronics.