Filament Vernier - Big Time Saver!
By Spencer C. on Apr 2nd 2024
Don't Wait for Weight
In the world of 3D printing, there's two types of people - those who have ruined a print by running out of filament, and those who will. On the hobbyist scale, this generally amounts to a nuisance, but if you're running a print farm with deadlines to meet, losing track of how much you've got left on your spools is a simple, yet critical task to get right. A task that has to be completed daily, with precision, for many machines. If you know anything about us, we jump on the opportunity to spend hours over-engineering a tool to save a few minutes a day. Read on to see our simple solution for this weighing issue.
Just Use a Sensor!
I can already hear it through the screen - "just use a filament runout sensor"! We have them, but don't use them. Why? Because we calibrate our machines on every new spool we load. Even if it's the same material, from the same manufacturer, from the same batch - the machines always are tested with a calibration print to get tuned. This is because even the best manufacturers have an acceptable range of filament diameters, and the mix of raw materials used in their filament can vary. Filament diameter changes of even 0.05mm are enough to warrant a tune up to ensure the parts we're making are as consistently strong, dimensionally accurate, and aesthetically beautiful as they can be. Therefore, before running a print, we need to make sure we've got enough on a spool of filament to ensure the part will be made continuously from one single spool.
We used a scale to weigh our material for a long time, but that eventually became difficult to scale (pun intended). We'd have to remove the spool from the dry box, carefully avoid tangles, and annotate the weight. Once a print was complete, it would be weighed, and that print weight subtracted from the total on the spool. When the spool was almost empty, say to 250g, we'd print a part that we knew weighed 200g or so to ensure we maximized the value we got out of every spool. When running 5, 10, or 20 machines this started to become a real hassle.
The Concept
The diameter of a filament roll will naturally decrease as the machine uses it up on prints. The rate of change in diameter, assuming a uniform 'stack' of filament, can therefore be tied to an equation that relates the total filament roll diameter to the remaining weight. This realization set things in motion for us, where we got to work on creating a tool to measure the filament diameter and output the remaining weight on a scale based on this equation.
Design Time
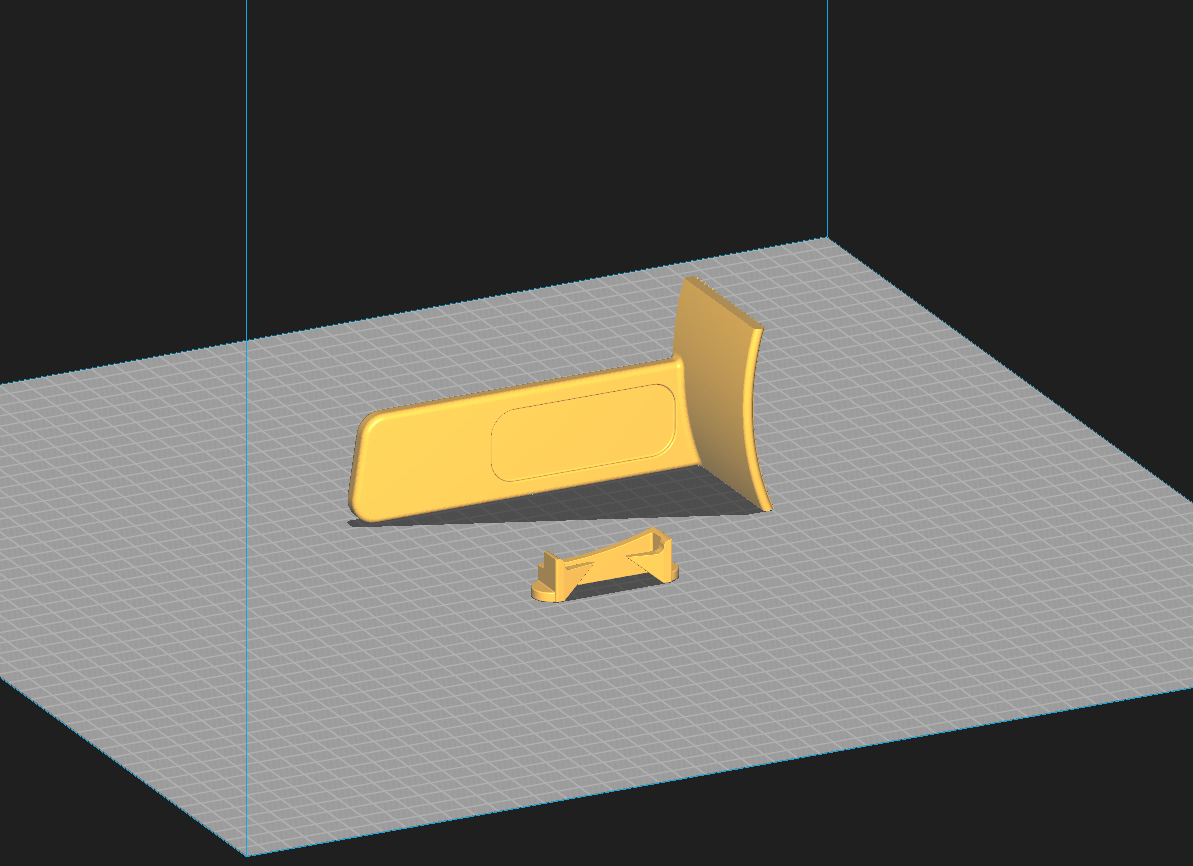
Our design, which we decided to call a spool vernier, is seen below:
The features that really matter are that it's a 2 piece design - the larger part is a static handle with a curved base that rests on the filament, and the second is a sliding scale, free to slide up and down the handle. The sliding scale has 'arrows' to point to the remaining filament scale, which will be on a plate attached to the recessed area. The back of the sliding scale is curved, carefully designed to slide down and ultimately interface with the large 'lip' of the spool. Big picture, the vernier will drop lower and lower as filament is used up, while the sliding scale stays 'static' on the lip of the filament spool.
We had to make the tool first before we could create the formula to define the weight vs diameter formula, so there's a fun chicken and egg scenario for you there. On to the math...
The Secret Formula
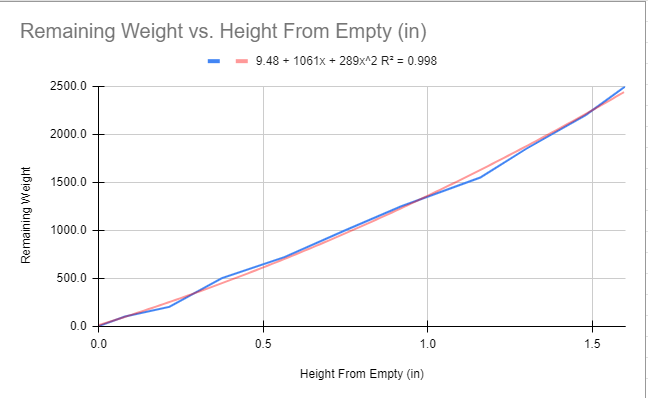
To determine the formula, I started by putting a blank piece of masking tape in the recessed portion of the vernier. Then, I set the tool on a fresh roll of filament, and marked a line where the arrows pointed. As several prints completed, I would weigh the spool and mark a line with the remaining weight, all the way until the roll was empty. I now had a data set relating the weight remaining to a distance between lines. However, the weights remaining and line spacing was random and needed to be made uniform. The data I had was input into Excel. Then, a trend line was fit to the data. The equation of the trend line was then used to create a uniform scale, in my case I decided to make my scale marks every 250g. The data and trend line is seen below:
Home Stretch
The last thing I needed to do was transfer the scale data into something physical that could be affixed to the vernier. I ultimately decided on buying an engraving tool for my Cricut machine. This would allow for precise spacing of the scale on a permanent surface, more accurately and finer in resolution than could be done by hand. I drew up the scale I needed in Funsion360, exported it as a .DXF to Cricut Design Space, and set up the Cricut for the job. The best results were achieved on an anodized aluminum dog tag. Check it out!
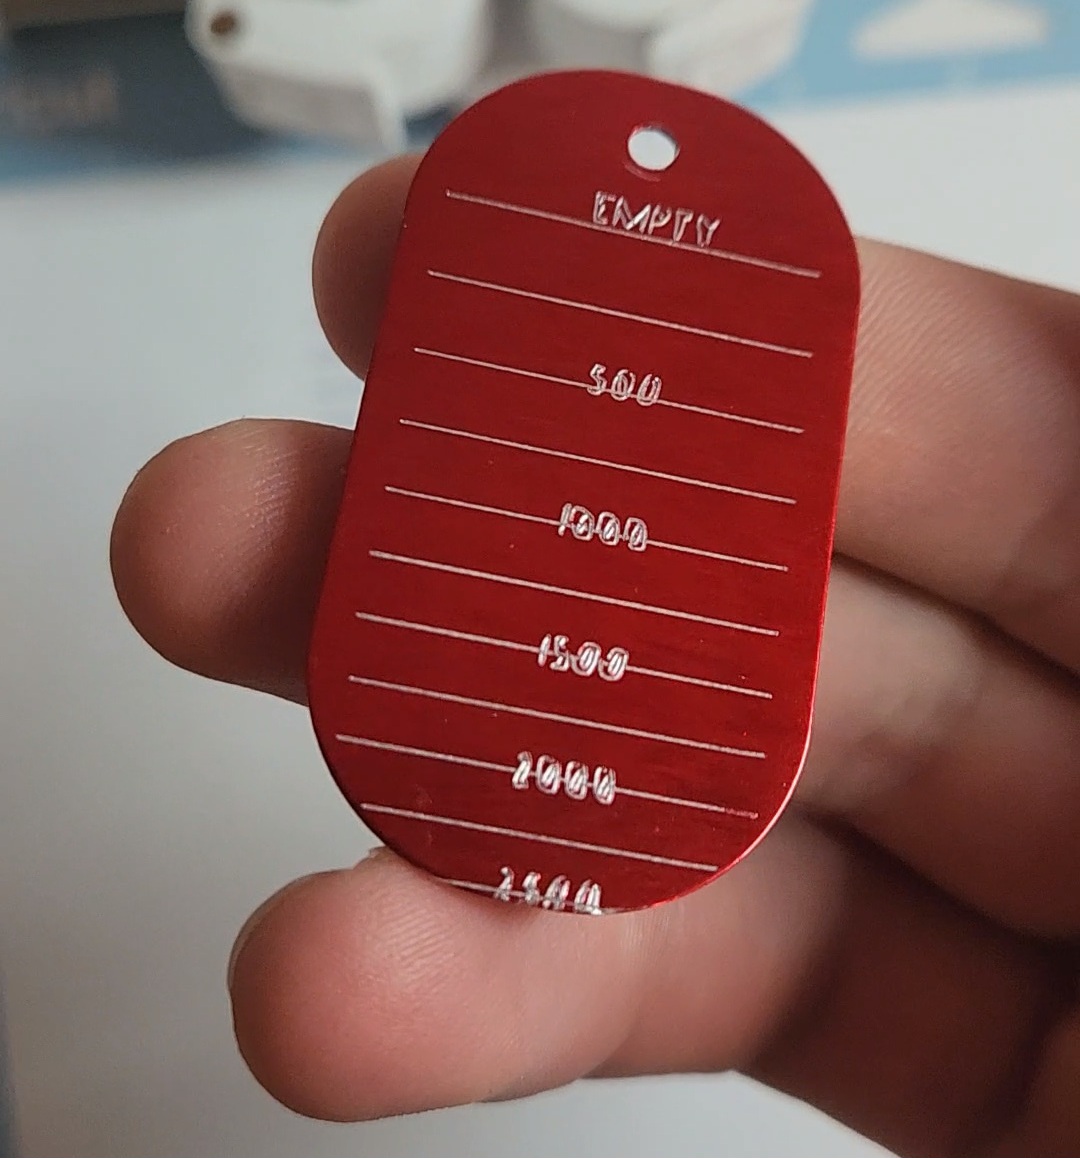
Finally, I had to install the engraved scale on the vernier body. I ensured it was calibrated by using an empty spool - I lined up the sliding scale to "EMPTY" on the tag and marked the top hole position on the vernier body. Finally, I attached it to the with a small screw.
The vernier in use:
Was it Worth it?
I used the finished vernier for a few spools worth of filament, and found it to be accurate within about 50g, at worst off by 100g on one measurement. More data collection across several spools will allow for us to fine tune the formula, so it's only going to be better from here!
Generally speaking, this is a fine enough resolution for us to know if we've got what we need to run a full size dash (250-400g usually). Even better, weight measurements can be made in just a few seconds on all the machines, even while they are running. Was time saved overall, considering the design and testing - maybe. Was this a fun project that taught us something new? Absolutely, and we hope you enjoyed it too.
Although this was designed for 2-3kg spools, you might get away with it on smaller ones, too. If you want to try it out yourself, .STL's are available here (Main body) and here (sliding scale). Print orientation is pictured below for support-free printing. Enjoy!